MOD Literature Repository User Guide
This guide explains how to use the group’s literature repository together with BibDesk. BibDesk is a free mac program that is a front end for a bibtex .bib file. It allows GUI-based manipulation of the database, easy importation of new references, and most importantly linking to a PDF of the article itself.
ssh setup
First you need to create an ssh key that will identify you on the server. That way you don’t have to type a password every time you want to sync your repo with the server. Open up a terminal and go to your home directory
cd ~
See if you have an ssh directory already:
ls .ssh
If you don’t have the directory yet (you will see something like ls: .ssh: No such file or directory) then create it:
mkdir .ssh
chmod 700 .shh
Now change into the ssh directory and take a look at what is there:
cd .ssh
ls
If you happen to see two files names id_rsa and id_rsa.pub then skip the following step. Otherwise create a key:
ssh-keygen -f id_rsa -t rsa -q
Now add the key to the ssh agent:
ssh-add id_rsa
The next step is to email me (gvoet@ucsd.edu) the contents of id_rsa.pub. You could for example type
less id_rsa.pub
and then copy and paste the output to an email. I will copy your public key to the server.
git setup
If you are working on a Mac your system should come with git pre-installed. Now set your name and email address, this will later identify you when you push your changes to the server. Run the two following commands after you modify them:
git config --global user.name "Your Name"
git config --global user.email email@example.com
This should have created a file named .gitconfig in your home directory. Open .gitconfig with your editor of choice and add the following settings as new lines after your name and email:
[push]
  default = simple
[alias]
  ca = !sh -c 'git add -A && git commit -m \"$1\" && git push' -
[core]
  precomposeunicode = false
Now go to the directory where you want the literature repo to reside. It will come within it’s own folder, so no need to create one extra directory level. This means if you go to your home directory now, the repo will be at /Users/yourhome/wavebib/. Choose any place you like! Now you are ready to clone the repository. This may take a while as it will copy a ton of pdfs that are already in there. Note that your ssh key has to be on the server for this to work!
git clone gituser@kipapa.ucsd.edu:/Users/gituser/repo/wavebib/
BibDesk setup
Before opening the cloned repository in BibDesk, tell the application to use relative paths only. This makes it easier to resolve future conflicts in the database. Copy the following command and run it in your shell:
defaults write edu.ucsd.cs.mmccrack.bibdesk BDSKSaveLinkedFilesAsRelativePathOnly -bool true
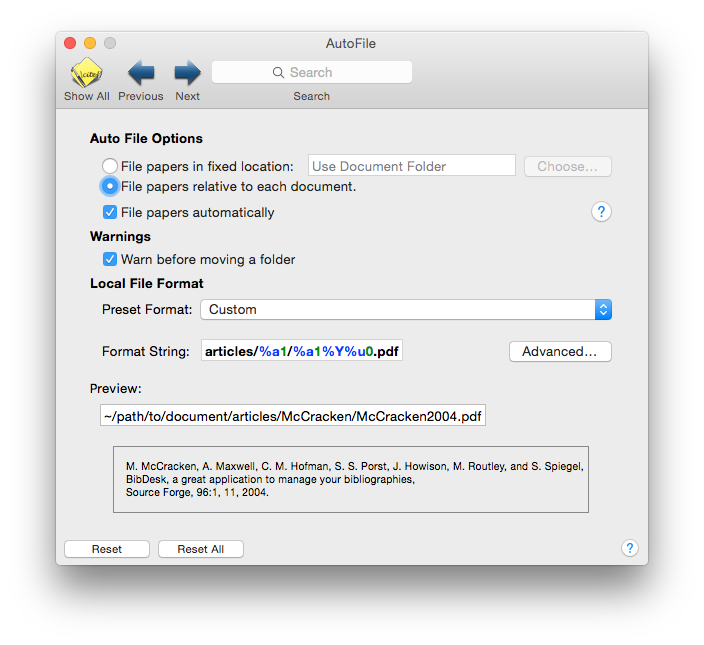
Now you are ready to open the main.bib file in BibDesk. You’ll be able to browse all the articles in the main.bib database (thousands of articles). Many are linked to a PDF, which you should just be able to click on. To use the database most effectively and easily, make three changes in the BibDesk preferences:
In ‘General’, set BibDesk to open the main.bib file upon starting.
Under ‘Autofile’ select ‘File papers relative to each document’ and check ‘File papers automatically’. For ‘local file format’ select Custom and enter the following string (by clicking ‘advanced’):
articles/%a1/%a1%Y%u0.pdf
Under ‘Cite Key Format’ check ‘Autogenerate the cite key when enough fields are supplied’. Set ‘Preset Format’ to Custom and set ‘Format String’ to
%a[][etal1]20%y.
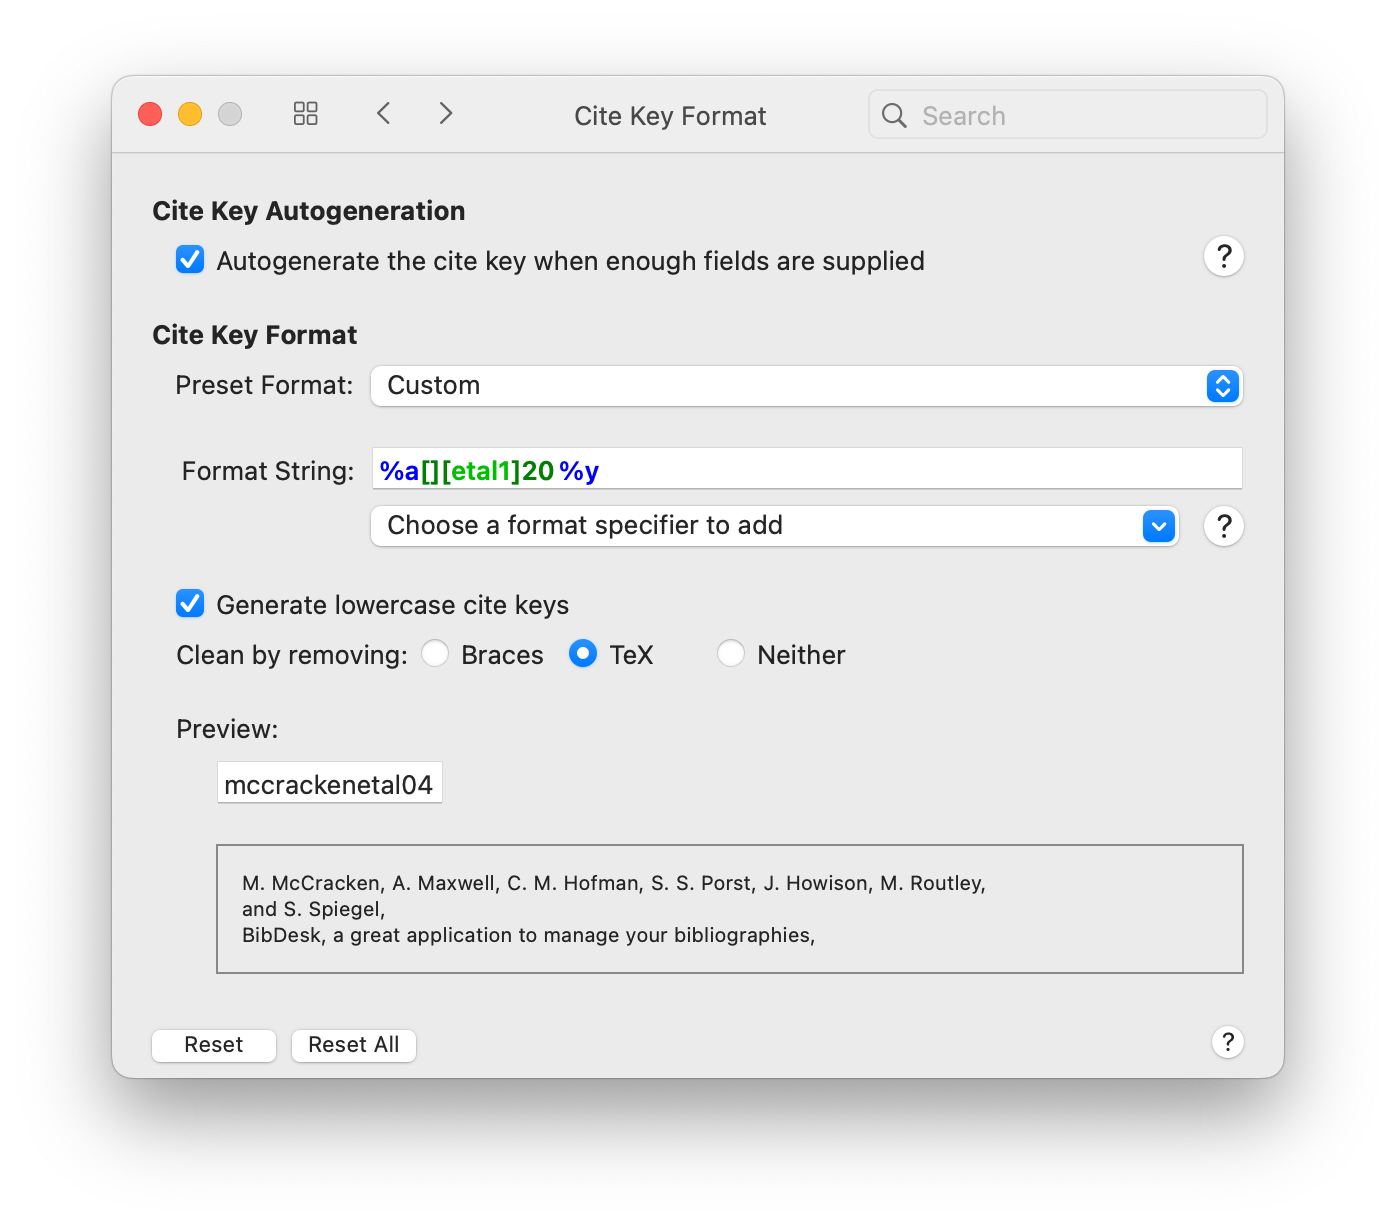
Now, you can easily import new articles by simply dragging the PDF onto the reference in BibDesk. BibDesk will automatically file the paper. The format string tells it to store the articles in a folder by the author’s last name, and to name them as (e.g.) Zhang2012a.pdf. If you add new references, please follow the convention we use for the cite key; e.g. zhangetal12, alfordgregg01a, etc. With the settings in ‘Cite Key Format’ you can also generate the cite key pressing cmd-k.
TexShop setup
Using BibDesk is really easy in TexShop. Make sure to check ‘BibDeskCompletions’ in the main preference pane. Once you have AutoCompletion setup, you can simply type part of the cite key in TexShop and hit Esc, and it will fill in the key from the database for you, letting you choose from a pulldown menu if there are multiples.
Making changes
For this to be useful, we ALL have to have good practices for updating our changes. You ‘check in’ and ‘check out’ versions from the repository with the commands below. If you run into trouble, contact me (Gunnar) and we’ll figure out how to merge different versions or how to get rid of unwanted changes.
Here are the steps.
1. Before making any changes, make sure you are current by first closing main.bib or quitting BibDesk, and (from the terminal window on your computer from the directory in which you have stored the database) typing
git pull
2. Make your changes in the .bib file, add pdfs… Make sure you save the .bib file when you are done! You can then review your changes by typing
git status
3. Now you push your changes to the server using the alias you created earlier in your .gitconfig-file:
git ca "your short comment"
Please provide something meaningful in the comment, like the cite key of the entry you just added. Don’t worry about it too much though if you just added a lot. Also, your name gets written to the log automatically, so no need to add your name to the comment. If everything is running smoothly your updates should now be up on the server and available to all other users.
Note that the alias git ca is just a short form of the more general git workflow for adding changes and new files to the repository. You could also add your changes with the following commands that 1) add all changes 2) commit them and 3) push them to the server:
git add -A
git commit -m "your comment"
git push
Tips & Tricks
For some journals, simply dragging a pdf into BibDesk will autogenerate a new entry. This works at least for JPO.
You can add a publication with just a doi in your clipboard. Go to Publication - New Publications from Clipboard and the magic happens. Just make sure to adjust the keys to our common structure.
On google scholar, if you go to Scholar preferences/Bibliography manager, you can select “Show links to import citations into Bibtex.” Then you can just copy the citation info and paste it from the clipboard into BibDesk.
To look up journal abbreviations (it’s nice to have them consistent!) go to http://woodward.library.ubc.ca/research-help/journal-abbreviations/
You can link main.bib to your local texmf settings, that way you can include the file with the simple command
bibliography{main}in any latex file. To link the file, type
ln -s /your/path/to/your/main.bib ~/Library/texmf/bibtex/bib/main.bib
If the repository grows very large on your harddrive you can reduce its size by running:
git gc